
Warning: Undefined variable $catTitle in /home/www/wwwroot/HTML/www.exportstart.com/wp-content/themes/826/header-lbanner.php on line 29
Warning: Undefined variable $catTitle in /home/www/wwwroot/HTML/www.exportstart.com/wp-content/themes/826/header-lbanner.php on line 29
Warning: Undefined variable $catTitle in /home/www/wwwroot/HTML/www.exportstart.com/wp-content/themes/826/header-lbanner.php on line 29
Warning: Undefined variable $catTitle in /home/www/wwwroot/HTML/www.exportstart.com/wp-content/themes/826/header-lbanner.php on line 29
Warning: Undefined variable $catTitle in /home/www/wwwroot/HTML/www.exportstart.com/wp-content/themes/826/header-lbanner.php on line 29
Warning: Undefined variable $catTitle in /home/www/wwwroot/HTML/www.exportstart.com/wp-content/themes/826/header-lbanner.php on line 29
Warning: Undefined variable $catTitle in /home/www/wwwroot/HTML/www.exportstart.com/wp-content/themes/826/header-lbanner.php on line 29

homemade quail plucker
2 月 . 14, 2025 04:02 Back to list
homemade quail plucker
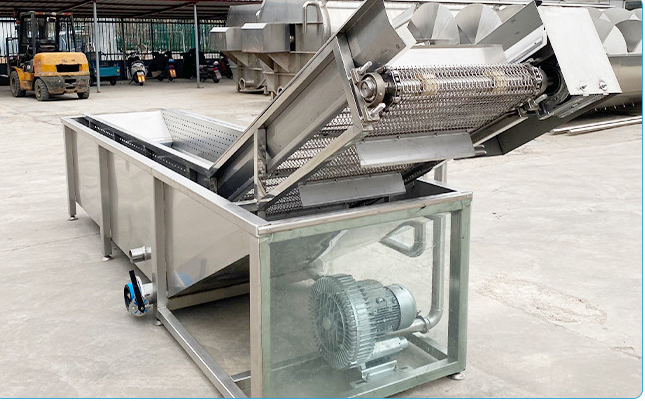
Building a homemade quail plucker is a rewarding project that combines practical ingenuity with craftsmanship, ultimately making the process of plucking quail feathers far more efficient and less strenuous. Let's delve into the intricacies of crafting your own quail plucker, drawing from expert insights, authoritative resources, and trustworthy methods to ensure both productivity and safety.
A significant part of maintaining the craftsmanship and longevity of your homemade quail plucker is regular maintenance. After each use, clean the drum and plucking fingers thoroughly to prevent the buildup of debris, which can cause mechanical issues over time. Regularly inspect the integrity of the rubber fingers, replacing any that show signs of wear and tear. Additionally, lubricate the motor and drum axle periodically to keep them running smoothly. In terms of expertise, it is advised to consult professionals or enthusiasts experienced in the mechanical and poultry fields. Joining forums or online communities focused on DIY poultry processing equipment can provide valuable advice and troubleshooting tips from seasoned users. Documenting your process and results can further enhance the collective knowledge within these communities, fostering a culture of safety and innovation. Furthermore, ensure that your homemade quail plucker meets any local legal standards for poultry processing equipment, thereby adding a layer of trustworthiness to your project. Many regions may have specific laws regarding homemade processing tools, so it’s critical to be informed and compliant. A homemade quail plucker is more than just a tool; it's a gateway to efficient, humane, and enjoyable poultry processing. With the right expertise, authoritative resources, and commitment to safety and quality, your project will not only meet but exceed expectations, reflecting your skill and dedication in providing exceptional homemade solutions. Investing in this endeavor enriches your personal skill set and serves as a valuable resource for refined poultry processing at home.
A significant part of maintaining the craftsmanship and longevity of your homemade quail plucker is regular maintenance. After each use, clean the drum and plucking fingers thoroughly to prevent the buildup of debris, which can cause mechanical issues over time. Regularly inspect the integrity of the rubber fingers, replacing any that show signs of wear and tear. Additionally, lubricate the motor and drum axle periodically to keep them running smoothly. In terms of expertise, it is advised to consult professionals or enthusiasts experienced in the mechanical and poultry fields. Joining forums or online communities focused on DIY poultry processing equipment can provide valuable advice and troubleshooting tips from seasoned users. Documenting your process and results can further enhance the collective knowledge within these communities, fostering a culture of safety and innovation. Furthermore, ensure that your homemade quail plucker meets any local legal standards for poultry processing equipment, thereby adding a layer of trustworthiness to your project. Many regions may have specific laws regarding homemade processing tools, so it’s critical to be informed and compliant. A homemade quail plucker is more than just a tool; it's a gateway to efficient, humane, and enjoyable poultry processing. With the right expertise, authoritative resources, and commitment to safety and quality, your project will not only meet but exceed expectations, reflecting your skill and dedication in providing exceptional homemade solutions. Investing in this endeavor enriches your personal skill set and serves as a valuable resource for refined poultry processing at home.
Next:
Latest news
-
Battery Layer Cage Systems With Automatic Feeding Machine
NewsMar.07,2025
-
Hot Selling Multi Function Vacuum Packaging Machine
NewsMar.07,2025
-
Chicken scalder plucker machine for sale poultry scalder chicken plucking machine
NewsMar.07,2025
-
Egg Tray Making Machine 1000, 2000, pulp molding machine
NewsMar.07,2025
-
Automatic Feeding Line System Pan Feeder Nipple Drinker
NewsMar.07,2025
-
cage layer chicken
NewsMar.07,2025


